The Ultimate Low-Quality Image Placeholder Technique
Written by Harry Roberts on CSS Wizardry.
Table of Contents
At the time of writing, 99.9% of pages on the web include at least one image. The median image-weight per page landed at 881KB in 2022, which is more than HTML, CSS, JS, and fonts combined! And while images do not block rendering (unless you do something silly), it’s important to consider how we offer a reasonably pleasant experience while users are waiting for images to load. One solution to that problem is Low-Quality Image Placeholders.
Low-Quality Image Placeholders
Low-Quality Image Placeholders are nothing new. Guy
Podjarny is responsible, I think, for coining
the term over a decade
ago! And
before that, we even had the lowsrc attribute for <img> elements:
<img lowsrc=lo-res.jpg src=hi-res.jpg alt>
I wish we’d never deprecated
lowsrc—it
would have saved us so much hassle in the long run.
The technique is simple: as images are typically heavier and slower resources, and they don’t block rendering, we should attempt to give users something to look at while they wait for the image to arrive. The solution? Show them a low-quality image placeholder, or LQIP.
The upshot is that the user knows that something is happening, and, ideally, they should have roughly some idea what is happening—after all, we want our LQIP to somewhat resemble the final image.
Core Web Vitals and Largest Contentful Paint
While LQIP isn’t a new subject at all, Core Web Vitals and Largest Contentful Paint are, and unfortunately, they don’t necessarily get along so well…
If your LCP candidate is an image (whether that’s a background-image or an
<img> element), it’s going to be somewhat slower than if your LCP candidate
was a text node, and while making image-based LCPs
fast
isn’t impossible, it is harder.
Using an LQIP while we wait for our full-res LCP candidate certainly fills a user-experience gap, but, owing to certain rules and restrictions with LCP as a spec (more on that later), it’s unlikely to help our LCP scores.
When the full resolution image eventually arrives, it’s likely that that image will be counted as your LCP, and not your LQIP:

It would be nice to have a scenario whereby your LQIP does meet requirements for consideration as LCP, leading to sub-2.5s scores, but also load in a high resolution soon after, thus improving the user experience. The best of both worlds:

Is that even possible? Let’s find out…
Largest Contentful Paint Caveats
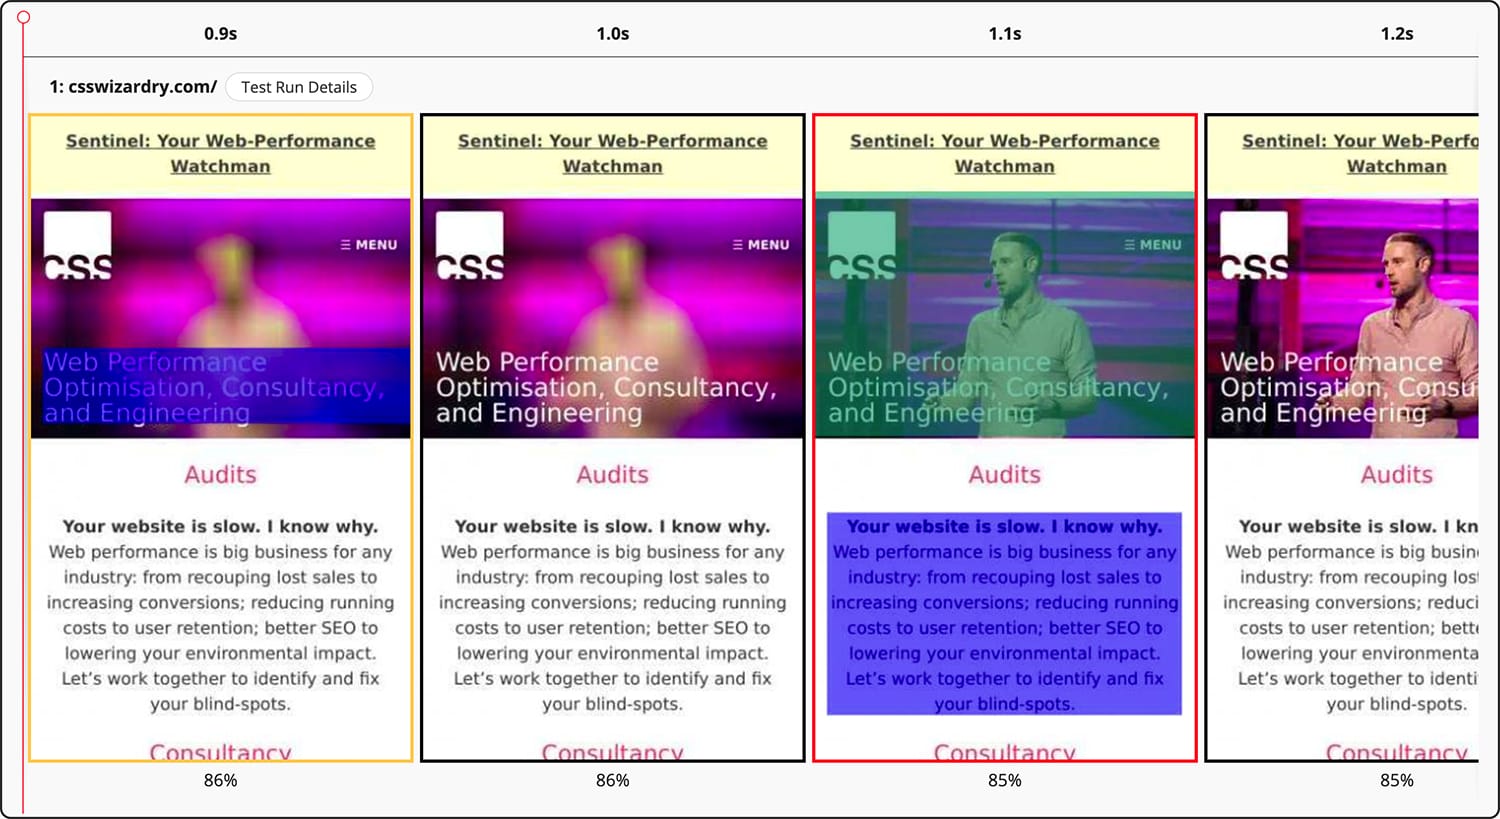
There is some important nuance that we should be aware of before we go any further. There are quite a few moving parts when it comes to how and when your LCP candidates are captured, when they’re updated, and which candidate is ultimately used.
Chrome keeps taking new LCP candidates right up until a user interacts with the
page. This means that if an <h1> is visible immediately, a user scrolls, then
a larger <img> arrives moments after, the <h1> is your LCP element for that
page. If a user doesn’t interact in that short window, a new entry is captured,
and now the <img> is your LCP element. Notice below how our <h1> is
momentarily considered our LCP candidate at 1.0s, before ultimately being
replaced by the <img> at 2.5s:

The key takeaway here is that Chrome keeps looking for new LCP candidates, and the moment it finds anything larger, it uses that.
What if Chrome finds a later element of the same size? Thankfully, Chrome will not consider new elements of the same size as the previously reported LCP candidate. That protects us in situations like this:

Note that at 1.4s we get our LCP event in full. When the other eight images arrive at 2.0s, they make no difference to our score.
This all seems straightforward enough—Chrome keeps on looking for the largest element and then uses that, right? And it doesn’t necessarily spell bad news for our LQIP either. As long as our final image is the same dimensions as the LQIP was…?
Not quite. There’s some subtle complexity designed to prevent people gaming the system, which is exactly what we’re trying to do.
Warning: It is imperative that you still provide a great user experience. Passing LCP for metrics’ sake is unwise and against the spirit of web performance. Ensure that your LQIP is still of sufficient quality to be useful, and follow it up immediately with your full-quality image. Poor quality images, particularly where ecommerce is concerned, are especially harmful.
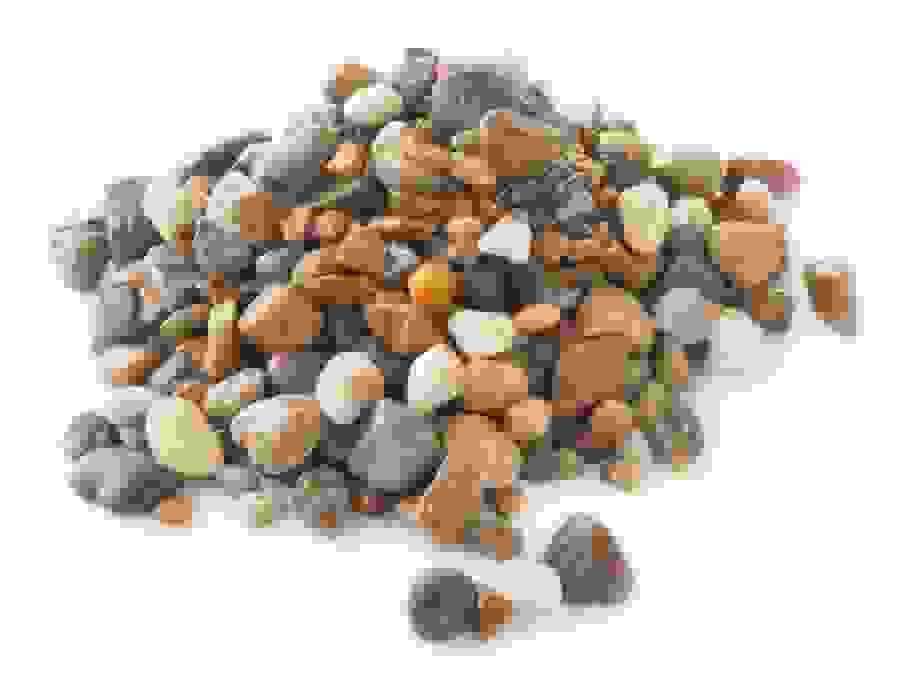
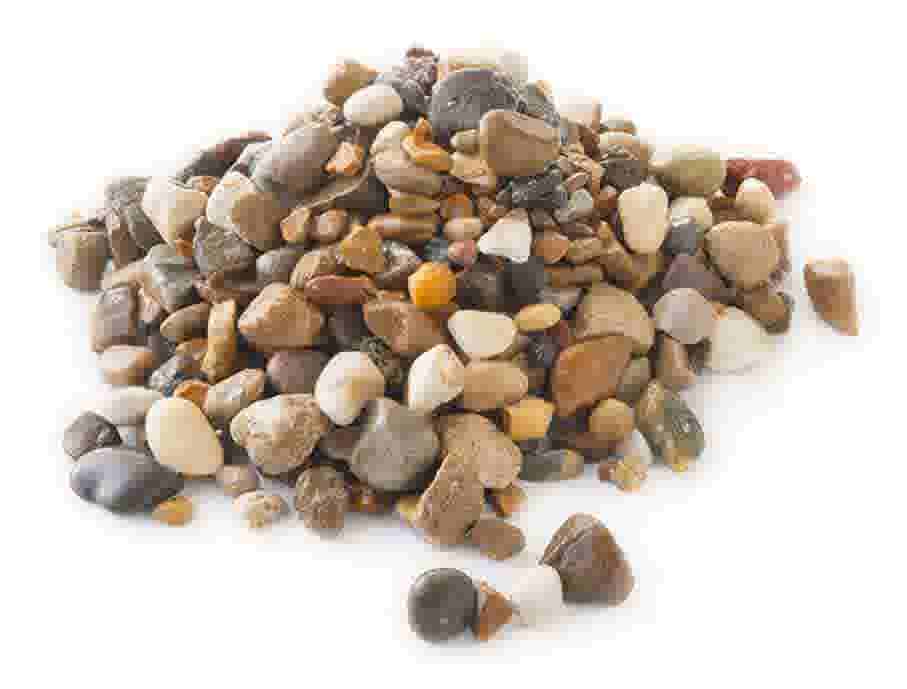
Don’t Upscale Your LQIP
Each image in the tests so far has been a 200×200px <img> displayed at
200×200px:
<img src=https://dummyimage.com/200/000/fff.png?2&text=200@200
     width=200 height=200 alt>
Which is this, coming at 2KB:

What if we change the <img> to 100×100px displayed at 200×200px, or
upscaled?
<img src=https://dummyimage.com/100/000/fff.png?4&text=100@200
     width=200 height=200 alt>
Which comes in at 1.4KB:

Already, you can see the loss in quality associated with upscaling this image.

Above, we see that we log a candidate at 1.5s, but the second image at 2.0s becomes our LCP despite being rendered at the exact same size!
And there is the nuance. Chrome doesn’t want to reward a poor experience, so simply serving a tiny image and displaying it much larger will not help your LCP scores if a denser image turns up later on. And I agree with this decision, for the most part.
The first takeaway is: don’t upscale your LQIP.
Calculating the Upscaling Penalty
Let’s get a bit more detailed about upscaling and penalties. Some close reading
of the spec
tells us exactly how this works. It’s not the easiest thing to digest, but I’ll
do my best to distil it for you here. The reported area of your LCP element is
calculated as:
area = size × penaltyFactor
Where:
sizeis the area of the LCP candidate currently in the viewport and not cropped or off-screen.penaltyFactoris the factor by which upscaling will count against us, given bymin(displaySize, naturalSize) / displaySize, where:naturalSizeis the pixel area of the image file in question.displaySizeis the pixel area that the image will be rendered, regardless of how much of it is currently on-screen.
In full:
area = size × min(displaySize, naturalSize) / displaySize
Imagine we took a large landscape image, downscaled it to a predetermined height, and then displayed it, cropped, as a square:
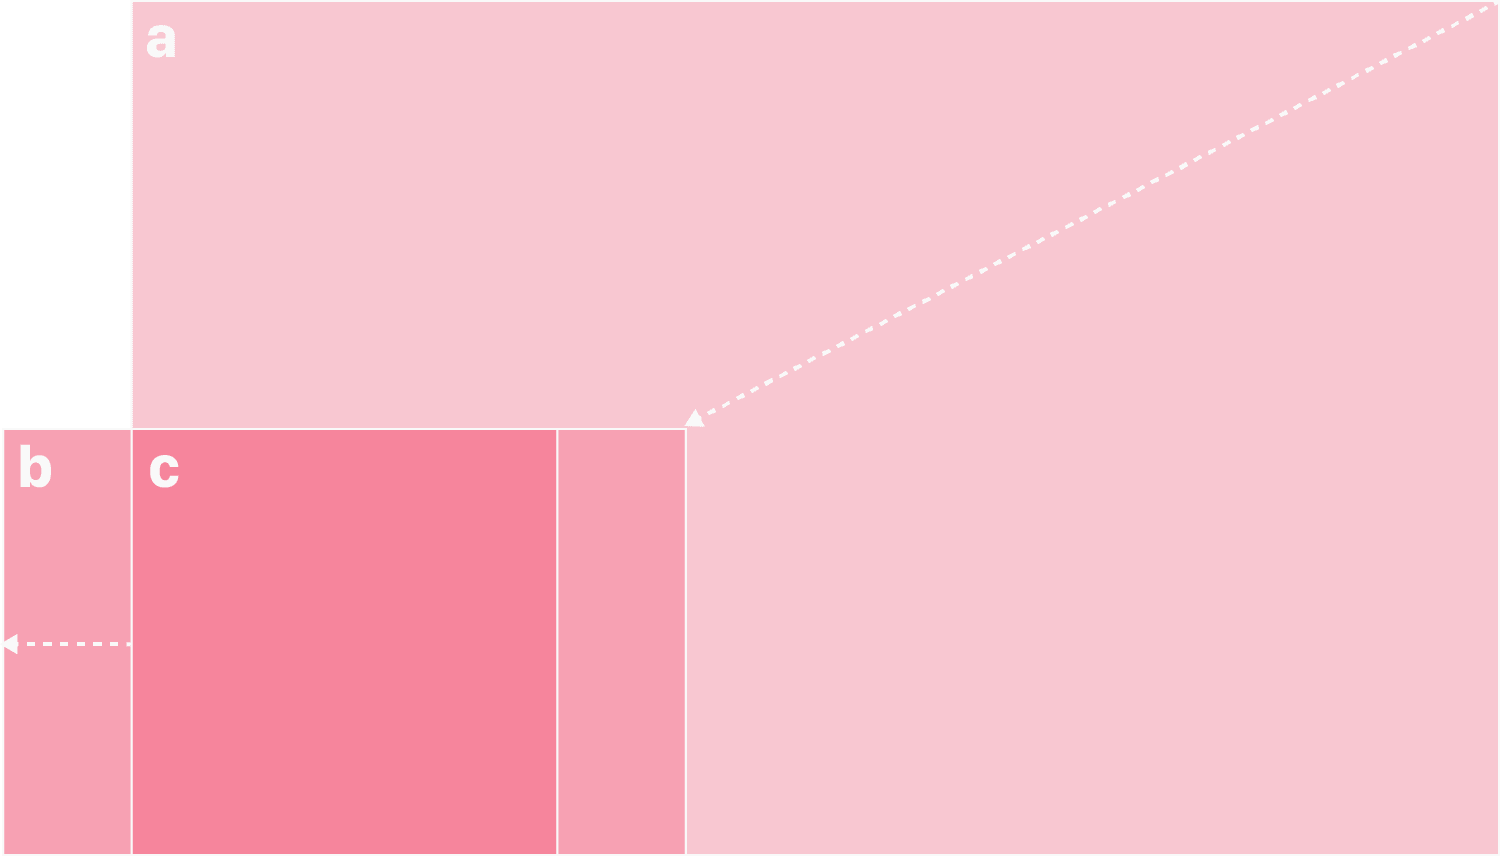
naturalSize, b is displaySize, and c is
size.For the sake of ease, let’s assume your LCP candidate is always fully on-screen,
in-viewport, and not cropped (if you have known and predictable cropping or
off-screen image data, you can adjust your maths accordingly). This means that
size and displaySize are now synonymous.
Let’s say we have a 400×400px image that is downscaled to 200×200px. Its area would be calculated as:
200 × 200 × min(200 × 200, 400 × 400) / (200 × 200) = 40,000
Thus the LCP’s reported size would be 40,000px2:

If we were to use a 100×100px image and upscale it to 200×200px, our equation looks a little different:
200 × 200 × min(200 × 200, 100 × 100) / (200 × 200) = 10,000

This image’s reported area is significantly smaller, despite being rendered at the exact same size! This means that any subsequent images of a higher quality may well steal our LCP score away from this one and to a much later time.
Even if we used a 199×199px LQIP, we’d still register a new LCP the moment our full quality image arrives:
200 × 200 × min(200 × 200, 199 × 199) / (200 × 200) = 39,601
That all got pretty academic, but my advice is basically: if you want your LQIP to be considered as your LCP, do not upscale it. If you do upscale it, your reported area will come back smaller than you might expect, and thus the later, high resolution image is likely to ‘steal’ the LCP score.
N.B. Thankfully, none of the specs take device pixels or pixel densities into account. It’s CSS pixels all the way down.
Aim for a Minimum of 0.05BPP
The second restriction we need to get around is the recently announced bits per pixel (BPP) threshold. Again, to stop people gaming the system, Chrome decided that only images of a certain quality (or entropy) will be considered as your LCP element. This prevents people using incredibly low quality images in order to register a fast LCP time:
That heuristic discounts paints which are not contentful, but just serve as backgrounds or placeholders for other content.
This change extends that heuristic to other images as well, when those images have very little content, when compared to the size at which they are displayed.
— Largest Contentful Paint change in Chrome 112 to ignore low-entropy images
This one is much simpler to make sense of. In order for an image to be counted as an LCP candidate, it needs to contain at least 0.05 bits of data per pixel displayed.
Note that this applies to the image’s displayed size and not its natural size:
Controls whether LCP calculations should exclude low-entropy images. If enabled, then the associated parameter sets the cutoff, expressed as the minimum number of bits of encoded image data used to encode each rendered pixel. Note that this is not just pixels of decoded image data; the rendered size includes any scaling applied by the rendering engine to display the content.
— features.cc
A 200×200px image has 40,000 pixels. If we need 0.05 bits of data for each pixel, the image needs to be at least 2,000 bits in size. To get that figure in Kilobytes, we simply need to divide it by 8,000: 0.25KB. That’s tiny!
A 1024×768px image?
(1024 × 768 × 0.05) / 8000 = 4.9152KB
720×360px?
(720 × 360 × 0.05) / 8000 = 1.62KB
That was much less academic, but my advice is basically: if you want your LQIP to ever be considered as your LCP, make sure it contains enough data.
To err on the side of caution, I go by a BPP figure of 0.055. Honestly, the filesizes you’re aiming for are so small at this point that you’ll probably struggle to get as low as 0.055BPP anyway, but it just seems wise to build in 10% of buffer in case any intermediaries attempt to compress your images further. (This should actually be impossible because you’re serving your images over HTTPS, right?)
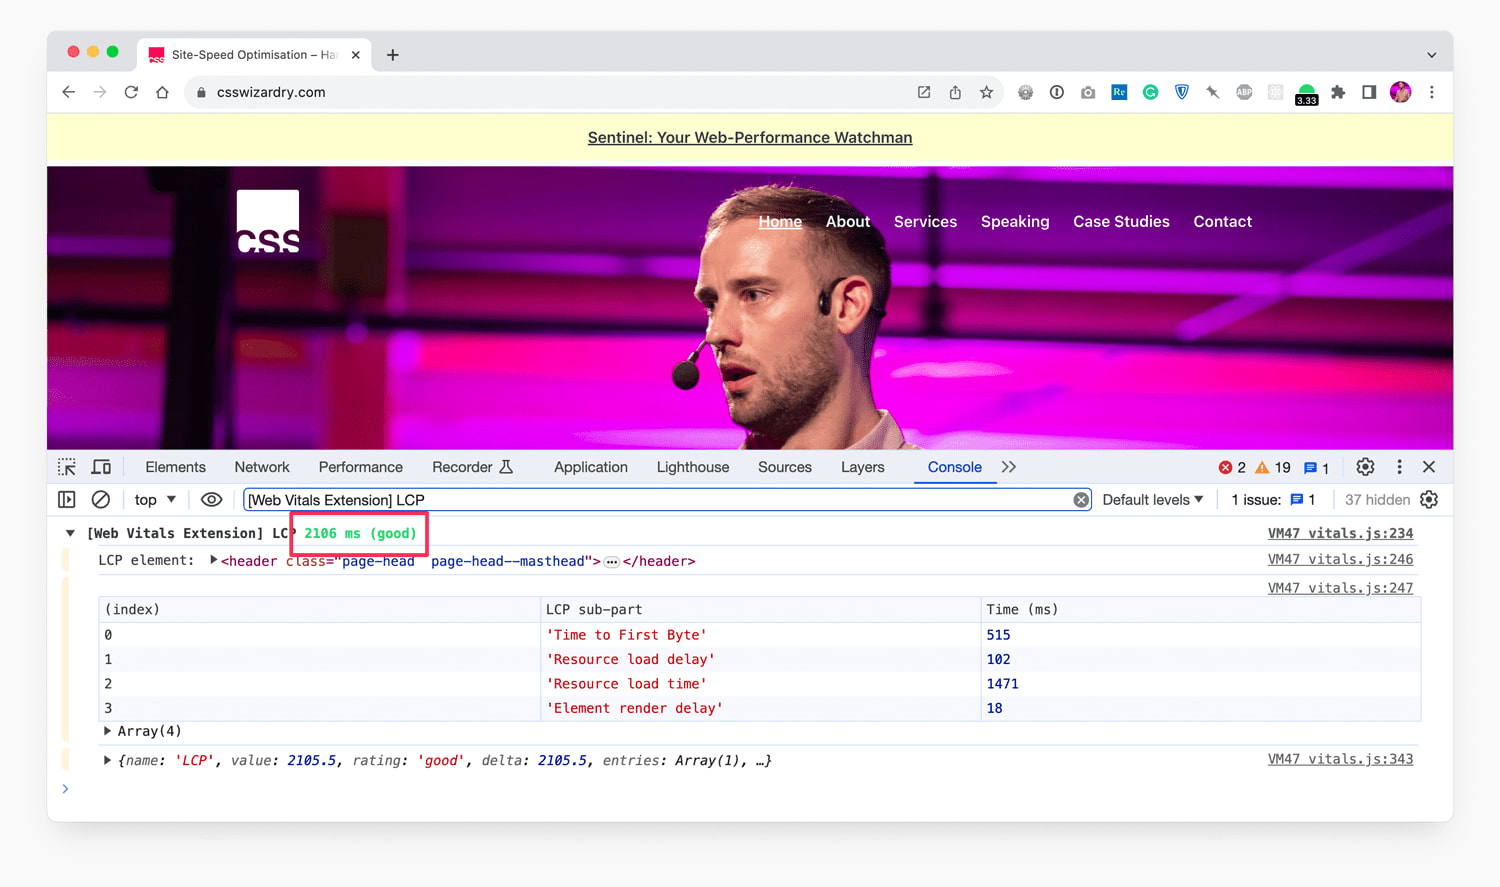
LQIP and BPP Calculator
That’s a lot of specs and numbers. Let’s try make it all a little easier. I’ve built this simplified calculator to help you work out the mathematically smallest possible LCP candidate. It is this image that becomes your LQIP.
Your LQIP should be 1,440×810px (1,166,400px2), and should have a filesize no smaller than 8.019KB.
Using the exact same calculator you’re playing with right now, I plugged in my homepage’s numbers and rebuilt my LCP. I managed to get my LQIP–LCP down to just 1.1s on a 3G connection.
<h1> and a <p>
are initially flagged as candidates before Chrome finally settles on the image. (View
full size)And from a cold cache, over train wifi as I was writing this post, I got a 2.1s LCP score on desktop!
Implementing Low-Quality Image Placeholders
My implementation becomes incredibly simple as I’m using a background image. This means I can simply layer up the progressively higher-resolution files using CSS’ multiple backgrounds:
<head>

  ...

  <link rel=preload as=image href=lo-res.jpg fetchpriority=high>

  ...

</head>
<body>

  <header style="background-image: url(hi-res.jpg),
                                   url(lo-res.jpg)">
    ...
  </header>

</body>
- As
background-imageis hidden from the preload scanner, I’mpreloading the LQIP (lo-res.jpg) so that it’s already on its way before the parser encounters the<header>.- Note that I’m not
preloadinghi-res.jpg—we don’t want the two images to race each other, we want them to arrive one after the other.
- Note that I’m not
- Once the parser reaches the
<header>, the request forhi-res.jpgis dispatched.- At this point, if it’s fully fetched, we can render
lo-res.jpgas the<header>’s background. - If
lo-res.jpgisn’t ready yet, we’d fall back to abackground-coloror similar while we wait.
- At this point, if it’s fully fetched, we can render
- As
lo-res.jpgis guaranteed to arrive first (it was requested much earlier and is much smaller in file-size), it gets displayed first. - Once
hi-res.jpgarrives, whenever that may be, it takes the place oflo-res.jpg, switching out automatically.
My very specific implementation is more complex and nuanced than that (it’s responsive and I also use a super low-resolution Base64 placeholder that’s far too small to be considered an LCP candidate), but that’s the main technique in a few lines. My layers look like this:

- The very first frame is 810 bytes of 16×11px Base64 image, far too
small to qualify for LCP, and massively upscaled:

- The second frame is a 24KB image that is both my LQIP and my LCP.
- The third and final frame is the full-resolution, 160KB image.
The background-image method only works if images are decorational. If your
image is content (e.g. it’s a product image), then semantically,
a background-image won’t be good enough. In this case, you’ll probably end up
absolutely positioning some <img> elements, but it’s also worth noting that
you can apply background-images to <img>s, so the technique I use will be
more or less identical. Something like this:
<head>

  ...

  <link rel=preload as=image href=lo-res.jpg fetchpriority=high>

  ...

</head>
<body>

  <img src=hi-res.jpg
       alt="Appropriate alternate text"
       width=360
       height=360
       style="background-image: url(lo-res.jpg)">

</body>
In fact, I do exactly that with the photo of me in the sidebar.
Use an Image Transformation Service
Being so tightly bound to these figures isn’t very redesign-friendly—you’d have to reprocess your entire image library if you made your LCP candidate any bigger. With this in mind, I wouldn’t recommend attempting this manually, or batch-processing your entire back catalogue.
Instead, use a service like Cloudinary to size and
compress images on the fly. This way, you only need to redesign a handful of
components and let Cloudinary do the rest on demand. They make available a
quality
parameter
that takes a number which is a value between 1 (smallest file size possible)
and 100 (best visual quality)
. E.g. q_80. Note that this number is not
a percentage.
To get your BPP down to roughly 0.05, you’re going to want to experiment with a really small number. Play around with numerous different images from your site to ensure whatever quality setting you choose doesn’t ever take you below 0.05BPP.
Use Your Judgement
If you do manage to get your image all the way down to your target filesize, there’s every chance it will be too low quality to be visually acceptable, even if it does satisfy LCP’s technical requirements.
Here’s a current client’s product image compressed down to 4KB (their target was actually 3.015KB, but even the most aggressive settings couldn’t get me all the way):
This is visually unacceptable as an LCP candidate, even though it ticks every box in the spec. My advice here—and it’s very subjective—is that you shouldn’t accept an LQIP–LCP that you wouldn’t be happy for a user to look at for any period of time.
In this particular instance, I bumped the quality up to 10, which came in at 12KB, was still super fast, but was visually much more acceptable.
Summary
In their attempts to prevent people gaming the system, spec writers have had to define exactly what that system is. Ironically, codifying these constraints makes gaming the system so much easier, as long as you can be bothered to read the specifications (which, luckily for you, I have).
Largest Contentful Paint candidates are penalised for upscaling and also for low entropy. By understanding how the upscaling algorithm works, and how to calculate target filesizes from input dimensions, we can generate the smallest possible legitimate LCP image which can be used as a low-quality placeholder while we wait for our full-resolution image to arrive. The best of both worlds.
Hi there, I’m Harry Roberts. I am an award-winning Consultant Web Performance Engineer, designer, developer, writer, and speaker from the UK. I write, Tweet, speak, and share code about measuring and improving site-speed. You should hire me.
You can now find me on Mastodon.
Projects

- ITCSS – coming soon…

Next Appearance
-
Talk & Workshop
 WebExpo: Prague (Czech Republic), May 2024